


Spring是目前世界上最流行的Java框架,它可以帮助我们更加快速、更加容易的来构建Java项目。而在Spring家族当中提供了很多优秀的框架,而所有的框架都是基于一个基础框架的SpringFramework(也就是Spring框架)。而前面我们也提到,如果我们直接基于Spring框架进行项目的开发,会比较繁琐。
这个繁琐主要体现在两个地方:
- 在pom.xml中依赖配置比较繁琐,在项目开发时,需要自己去找到对应的依赖,还需要找到依赖它所配套的依赖以及对应版本,否则就会出现版本冲突问题。
- 在使用Spring框架进行项目开发时,需要在Spring的配置文件中做大量的配置,这就造成Spring框架入门难度较大,学习成本较高。
基于Spring存在的问题,官方在Spring框架4.0版本之后,又推出了一个全新的框架:SpringBoot。
通过 SpringBoot来简化Spring框架的开发(是简化不是替代)。我们直接基于SpringBoot来构建Java项目,会让我们的项目开发更加简单,更加快捷。
SpringBoot框架之所以使用起来更简单更快捷,是因为SpringBoot框架底层提供了两个非常重要的功能:一个是起步依赖,一个是自动配置。

- 通过SpringBoot所提供的起步依赖,就可以大大的简化pom文件当中依赖的配置,从而解决了Spring框架当中依赖配置繁琐的问题。
- 通过自动配置的功能就可以大大的简化框架在使用时bean的声明以及bean的配置。我们只需要引入程序开发时所需要的起步依赖,项目开发时所用到常见的配置都已经有了,我们直接使用就可以了。
起步依赖
假如我们没有使用SpringBoot,用的是Spring框架进行web程序的开发,此时我们就需要引入web程序开发所需要的一些依赖。
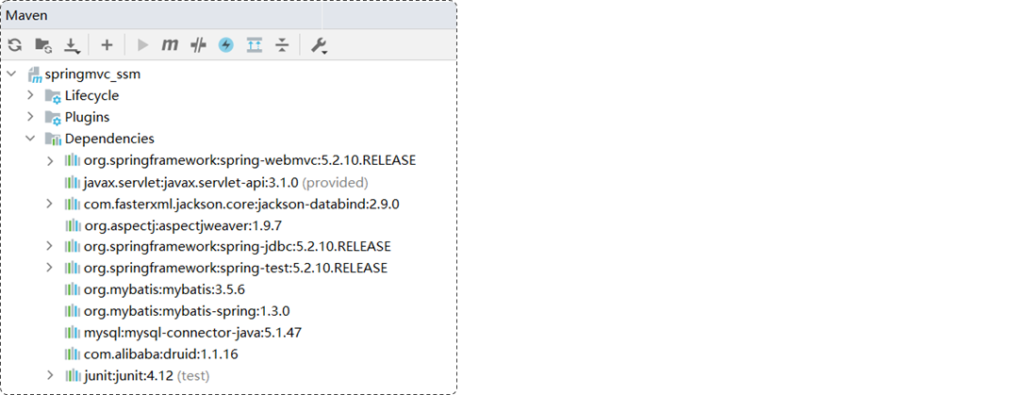
- spring-webmvc依赖:这是Spring框架进行web程序开发所需要的依赖
- servlet-api依赖:Servlet基础依赖
- jackson-databind依赖:JSON处理工具包
- 如果要使用AOP,还需要引入aop依赖、aspect依赖
项目中所引入的这些依赖,还需要保证版本匹配,否则就可能会出现版本冲突问题。
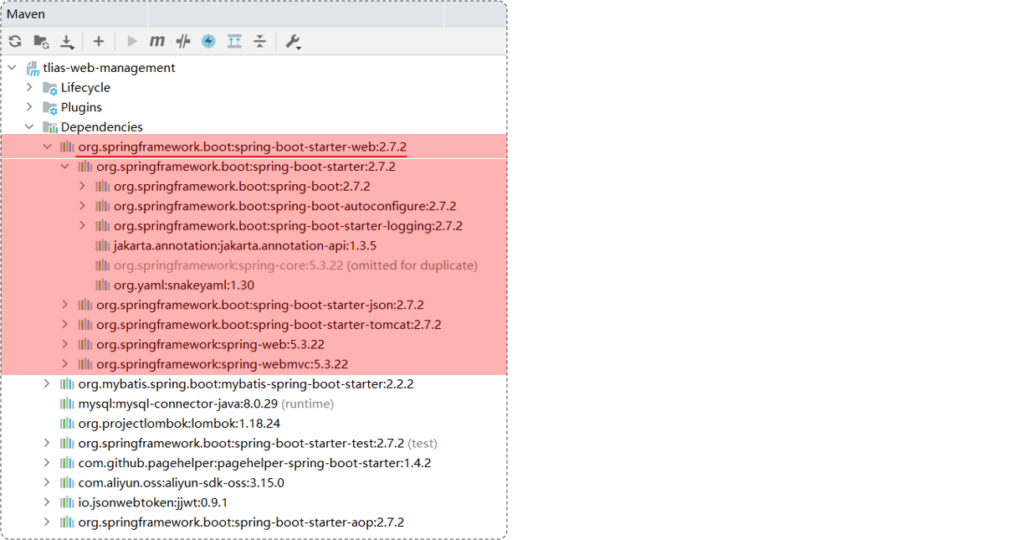
如果我们使用了SpringBoot,就不需要像上面这么繁琐的引入依赖了。我们只需要引入一个依赖就可以了,那就是web开发的起步依赖:springboot-starter-web。
为什么我们只需要引入一个web开发的起步依赖,web开发所需要的所有的依赖都有了呢?
- 因为Maven的依赖传递。
- 在SpringBoot给我们提供的这些起步依赖当中,已提供了当前程序开发所需要的所有的常见依赖(官网地址:https://docs.spring.io/spring-boot/docs/2.7.7/reference/htmlsingle/#using.build-systems.starters)。
- 比如:springboot-starter-web,这是web开发的起步依赖,在web开发的起步依赖当中,就集成了web开发中常见的依赖:json、web、webmvc、tomcat等。我们只需要引入这一个起步依赖,其他的依赖都会自动的通过Maven的依赖传递进来。
结论:起步依赖的原理就是Maven的依赖传递。
自动配置
概述
SpringBoot的自动配置就是当Spring容器启动后,一些配置类、bean对象就自动存入到了IOC容器中,不需要我们手动去声明,从而简化了开发,省去了繁琐的配置操作。
比如:我们要进行事务管理、要进行AOP程序的开发,此时就不需要我们再去手动的声明这些bean对象了,我们直接使用就可以从而大大的简化程序的开发,省去了繁琐的配置操作。
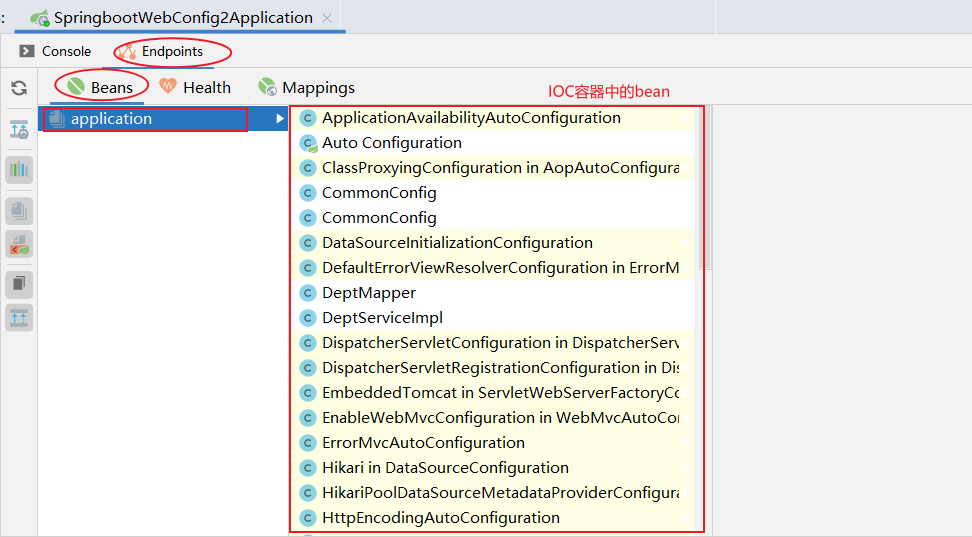
下面我们打开idea,一起来看下自动配置的效果:
- 运行SpringBoot启动类
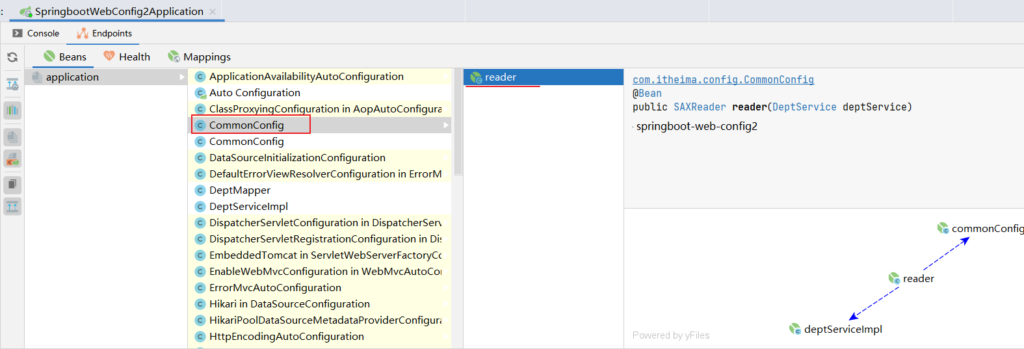
大家会看到有两个CommonConfig,在第一个CommonConfig类中定义了一个bean对象,bean对象的名字叫reader。
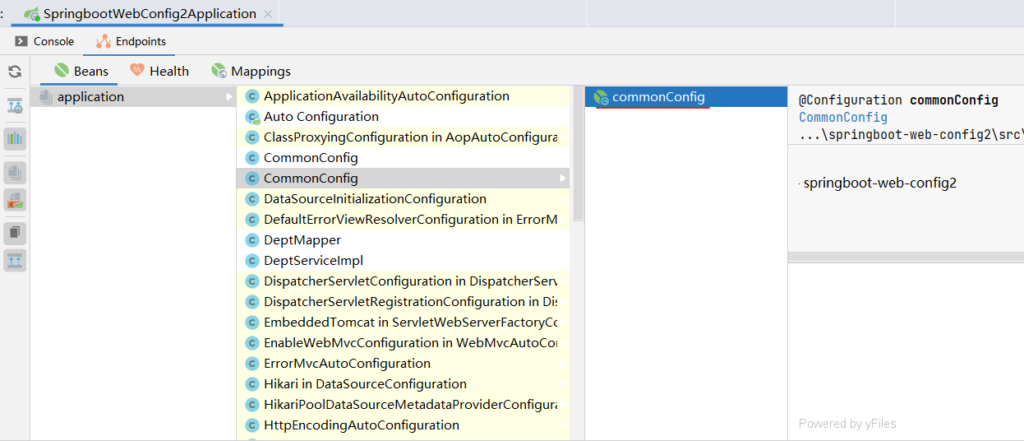
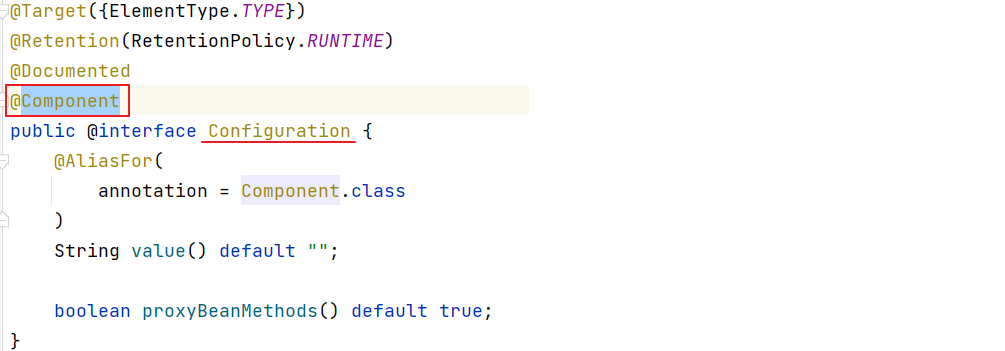
在第二个CommonConfig中它的bean名字叫commonConfig,为什么还会有这样一个bean对象呢?原因是在CommonConfig配置类上添加了一个注解@Configuration,而@Configuration底层就是@Component,所以配置类最终也是SpringIOC容器当中的一个bean对象。
在IOC容器中除了我们自己定义的bean以外,还有很多配置类,这些配置类都是SpringBoot在启动的时候加载进来的配置类。这些配置类加载进来之后,它也会生成很多的bean对象。
比如:配置类GsonAutoConfiguration里面有一个bean,bean的名字叫gson,它的类型是Gson。
com.google.gson.Gson是谷歌包中提供的用来处理JSON格式数据的。

当我们想要使用这些配置类中生成的bean对象时,可以使用@Autowired就自动注入了:
import com.google.gson.Gson;
import com.itheima.pojo.Result;
import org.junit.jupiter.api.Test;
import org.springframework.beans.factory.annotation.Autowired;
import org.springframework.boot.test.context.SpringBootTest;

@SpringBootTest
public class AutoConfigurationTests {

    @Autowired
    private Gson gson;


    @Test
    public void testJson(){
        String json = gson.toJson(Result.success());
        System.out.println(json);
    }
}
添加断点,使用debug模式运行测试类程序:
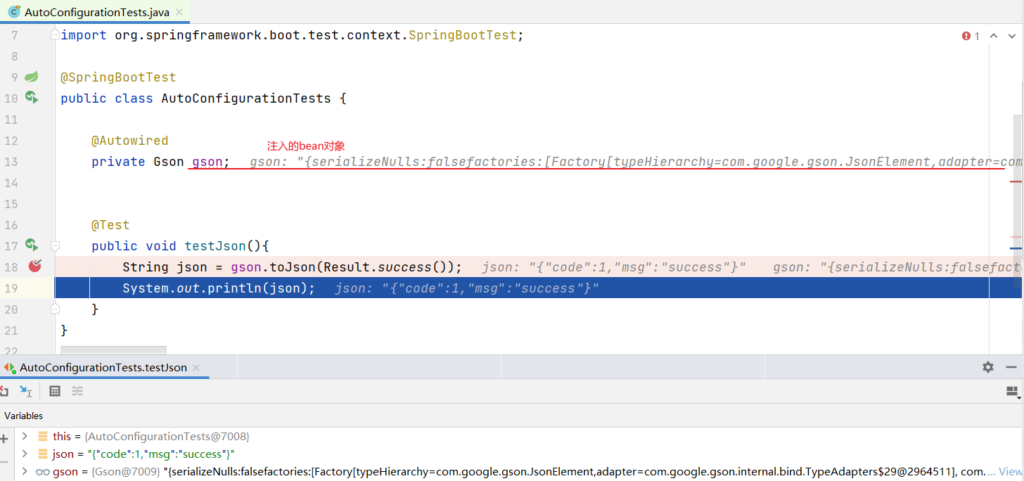
问题:在当前项目中我们并没有声明谷歌提供的Gson这么一个bean对象,却可以通过@Autowired从Spring容器中注入bean对象,那么这个bean对象怎么来的?
答案:SpringBoot项目在启动时通过自动配置完成了bean对象的创建。
常见方案
我们知道了什么是自动配置之后,接下来我们就要来剖析自动配置的原理。解析自动配置的原理就是分析在 SpringBoot项目当中,我们引入对应的依赖之后,是如何将依赖jar包当中所提供的bean以及配置类直接加载到当前项目的SpringIOC容器当中的。
接下来,我们就直接通过代码来分析自动配置原理。
准备工作:在Idea中导入”资料\03. 自动配置原理”下的itheima-utils工程
1、在SpringBoot项目 spring-boot-web-config2 工程中,通过坐标引入itheima-utils依赖
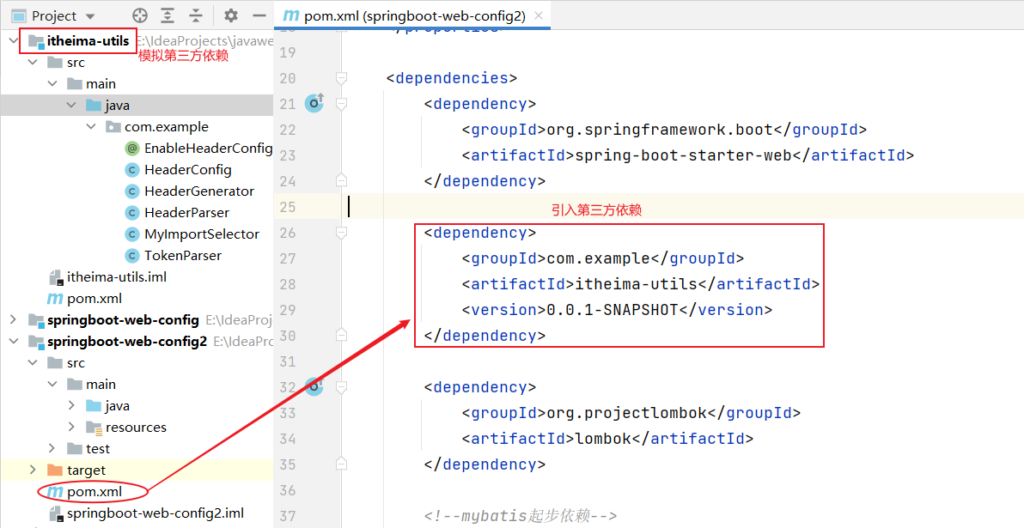
@Component
public class TokenParser {
    public void parse(){
        System.out.println("TokenParser ... parse ...");
    }
}
2、在测试类中,添加测试方法
@SpringBootTest
public class AutoConfigurationTests {

    @Autowired
    private ApplicationContext applicationContext;


    @Test
    public void testTokenParse(){
        System.out.println(applicationContext.getBean(TokenParser.class));
    }

    //省略其他代码...
}
异常信息描述: 没有com.example.TokenParse类型的bean
说明:在Spring容器中没有找到com.example.TokenParse类型的bean对象
引入进来的第三方依赖当中的bean以及配置类为什么没有生效?
- 原因在我们之前讲解IOC的时候有提到过,在类上添加@Component注解来声明bean对象时,还需要保证@Component注解能被Spring的组件扫描到。
- SpringBoot项目中的@SpringBootApplication注解,具有包扫描的作用,但是它只会扫描启动类所在的当前包以及子包。
- 当前包:com.itheima, 第三方依赖中提供的包:com.example(扫描不到)
那么如何解决以上问题?
- 方案1:@ComponentScan 组件扫描
- 方案2:@Import 导入(使用@Import导入的类会被Spring加载到IOC容器中)
@ComponentScan组件扫描
@SpringBootApplication
@ComponentScan({"com.itheima","com.example"}) //指定要扫描的包
public class SpringbootWebConfig2Application {
    public static void main(String[] args) {
        SpringApplication.run(SpringbootWebConfig2Application.class, args);
    }
}
如果采用以上这种方式来完成自动配置,那我们进行项目开发时,当需要引入大量的第三方的依赖,就需要在启动类上配置N多要扫描的包,这种方式会很繁琐。而且这种大面积的扫描性能也比较低。
缺点:
- 使用繁琐
- 性能低
结论:SpringBoot中并没有采用以上这种方案。
@Import导入
- 导入形式主要有以下几种:
- 导入普通类
- 导入配置类
- 导入ImportSelector接口实现类
1). 使用@Import导入普通类:
@Import(TokenParser.class) //导入的类会被Spring加载到IOC容器中
@SpringBootApplication
public class SpringbootWebConfig2Application {
    public static void main(String[] args) {
        SpringApplication.run(SpringbootWebConfig2Application.class, args);
    }
}
2). 使用@Import导入配置类:
- 配置类
@Configuration
public class HeaderConfig {
    @Bean
    public HeaderParser headerParser(){
        return new HeaderParser();
    }

    @Bean
    public HeaderGenerator headerGenerator(){
        return new HeaderGenerator();
    }
}- 启动类
@Import(HeaderConfig.class) //导入配置类
@SpringBootApplication
public class SpringbootWebConfig2Application {
    public static void main(String[] args) {
        SpringApplication.run(SpringbootWebConfig2Application.class, args);
    }
}- 测试类
@SpringBootTest
public class AutoConfigurationTests {
    @Autowired
    private ApplicationContext applicationContext;

    @Test
    public void testHeaderParser(){
        System.out.println(applicationContext.getBean(HeaderParser.class));
    }

    @Test
    public void testHeaderGenerator(){
        System.out.println(applicationContext.getBean(HeaderGenerator.class));
    }

    //省略其他代码...
}
3). 使用@Import导入ImportSelector接口实现类:
- ImportSelector接口实现类
public class MyImportSelector implements ImportSelector {
    public String[] selectImports(AnnotationMetadata importingClassMetadata) {
        //返回值字符串数组(数组中封装了全限定名称的类)
        return new String[]{"com.example.HeaderConfig"};
    }
}- 启动类
@Import(MyImportSelector.class) //导入ImportSelector接口实现类
@SpringBootApplication
public class SpringbootWebConfig2Application {

    public static void main(String[] args) {
        SpringApplication.run(SpringbootWebConfig2Application.class, args);
    }
}
我们使用@Import注解通过这三种方式都可以导入第三方依赖中所提供的bean或者是配置类。
如果基于以上方式完成自动配置,当要引入一个第三方依赖时,还需要知道第三方依赖中有哪些配置类和哪些Bean对象,对程序员来讲,很不友好,而且比较繁琐。当我们要使用第三方依赖,依赖中到底有哪些bean和配置类,只有第三方依赖自身最清楚。
结论:我们不用自己指定要导入哪些bean对象和配置类,让第三方依赖自己来指定。
怎么让第三方依赖自己指定bean对象和配置类?
- 比较常见的方案就是第三方依赖给我们提供一个注解,这个注解一般都以@EnableXxxx开头的注解,注解中封装的就是@Import注解
4). 使用第三方依赖提供的 @EnableXxxxx注解
- 第三方依赖中提供的注解
@Retention(RetentionPolicy.RUNTIME)
@Target(ElementType.TYPE)  //第1、2行是元注解,不必在意
@Import(MyImportSelector.class)//指定要导入哪些bean对象或配置类
public @interface EnableHeaderConfig {
}- 在使用时只需在启动类上加上@EnableXxxxx注解即可
@EnableHeaderConfig  //使用第三方依赖提供的Enable开头的注解
@SpringBootApplication
public class SpringbootWebConfig2Application {
    public static void main(String[] args) {
        SpringApplication.run(SpringbootWebConfig2Application.class, args);
    }
}
以上四种方式都可以完成导入操作,但是第4种方式会更方便更优雅,而这种方式也是SpringBoot当中所采用的方式。
原理分析
源码跟踪
前面讲解了在项目当中引入第三方依赖之后,如何加载第三方依赖中定义好的bean对象以及配置类,从而完成自动配置操作。那下面通过源码跟踪的形式来剖析下SpringBoot底层到底是如何完成自动配置的。
要搞清楚SpringBoot的自动配置原理,要从SpringBoot启动类上使用的核心注解@SpringBootApplication开始分析:
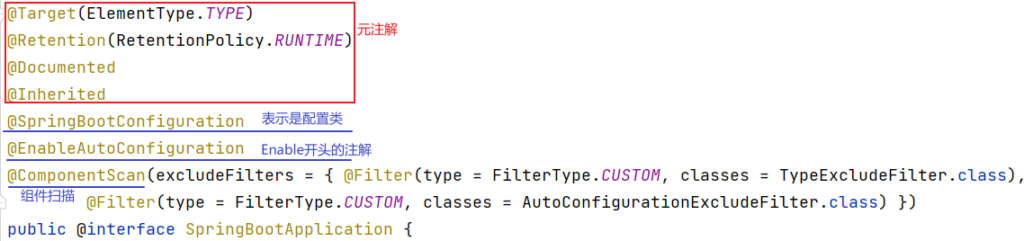
在@SpringBootApplication注解中包含了:
- 元注解(不再解释)
- @SpringBootConfiguration
- @EnableAutoConfiguration
- @ComponentScan
我们先来看第一个注解:@SpringBootConfiguration
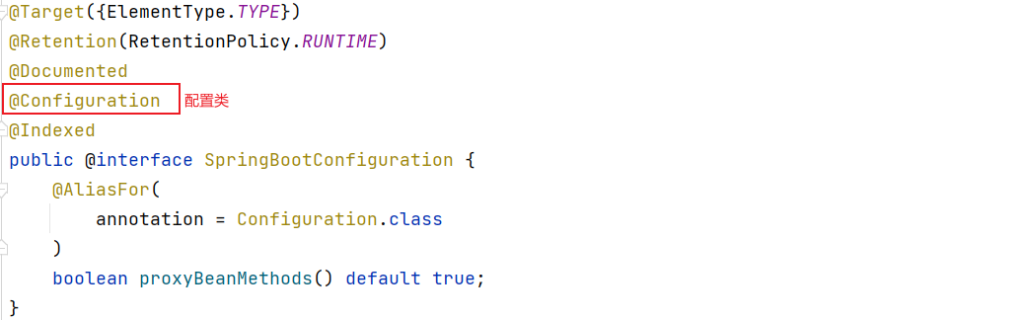
@SpringBootConfiguration注解上使用了@Configuration,表明SpringBoot启动类就是一个配置类。
@Indexed注解,是用来加速应用启动的(不用关心)。
接下来再先看@ComponentScan注解:

@ComponentScan注解是用来进行组件扫描的,扫描启动类所在的包及其子包下所有被@Component及其衍生注解声明的类。
SpringBoot启动类,之所以具备扫描包功能,就是因为包含了@ComponentScan注解。
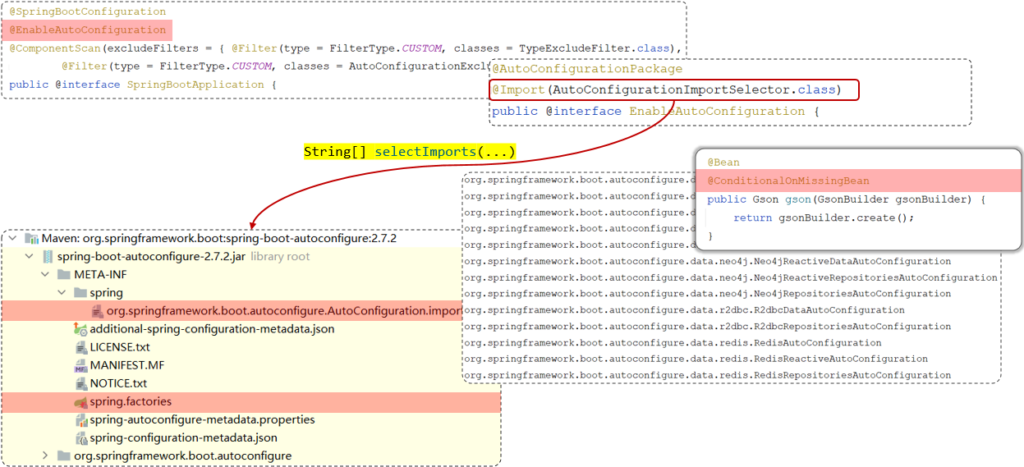
最后来看看@EnableAutoConfiguration注解(自动配置核心注解):
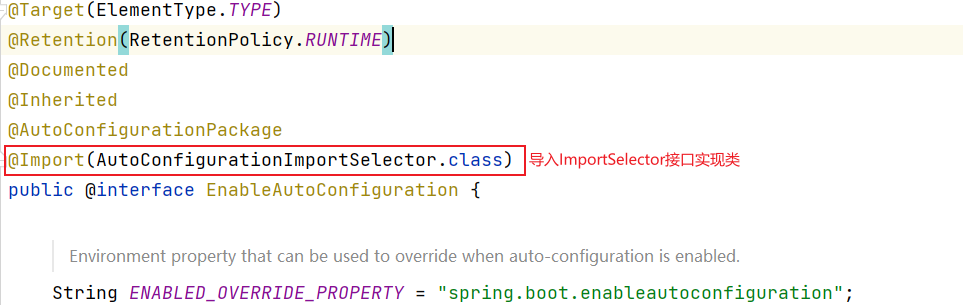
使用@Import注解,导入了实现ImportSelector接口的实现类。
AutoConfigurationImportSelector类是ImportSelector接口的实现类。
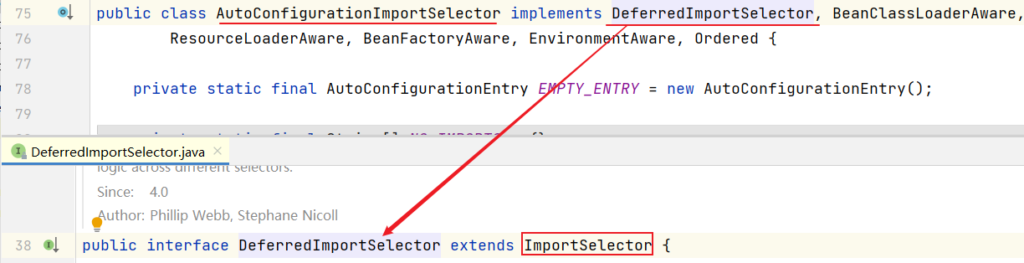
AutoConfigurationImportSelector类中重写了ImportSelector接口的selectImports()方法:
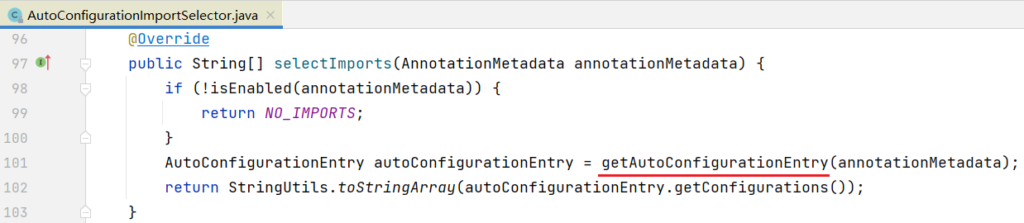
selectImports()方法底层调用getAutoConfigurationEntry()方法,获取可自动配置的配置类信息集合
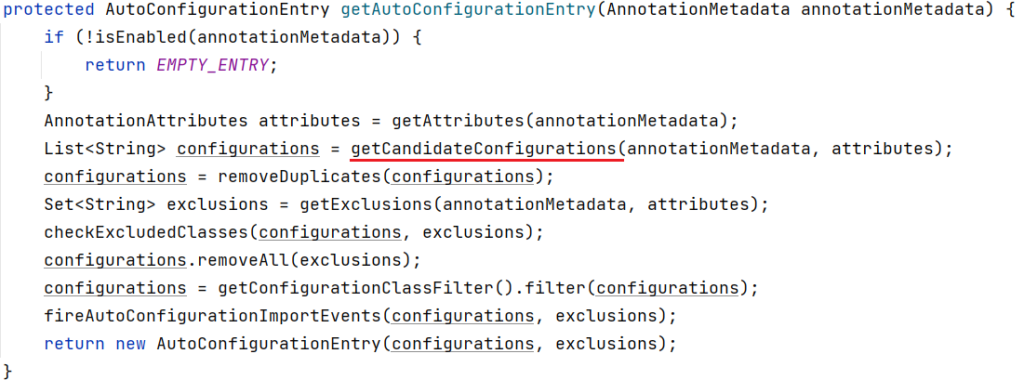
getAutoConfigurationEntry()方法通过调用getCandidateConfigurations(annotationMetadata, attributes)方法获取在配置文件中配置的所有自动配置类的集合
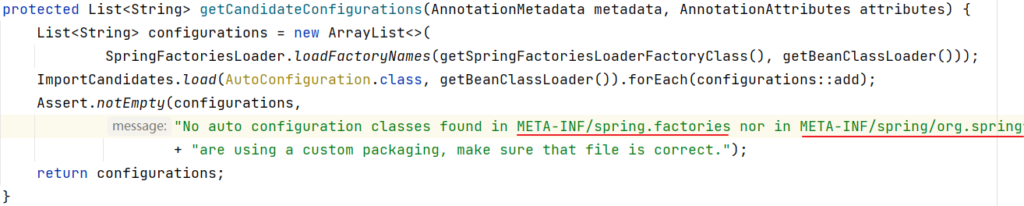
getCandidateConfigurations方法的功能:
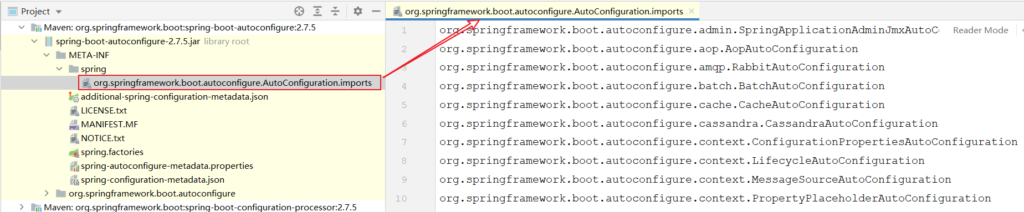
获取所有基于META-INF/spring/org.springframework.boot.autoconfigure.AutoConfiguration.imports文件、META-INF/spring.factories文件中配置类的集合
META-INF/spring/org.springframework.boot.autoconfigure.AutoConfiguration.imports文件和META-INF/spring.factories文件这两个文件在哪里呢?
- 通常在引入的起步依赖中,都有包含以上两个文件
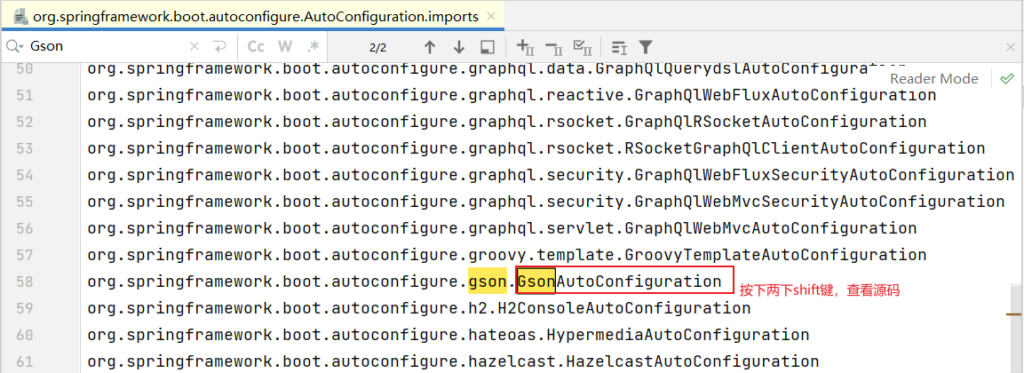
在前面在自动配置的时候,我们直接在测试类当中注入了一个叫gson的bean对象,进行JSON格式转换。虽然我们没有配置bean对象,但是我们是可以直接注入使用的。原因就是因为在自动配置类当中做了自动配置。到底是在哪个自动配置类当中做的自动配置呢?我们通过搜索来查询一下。
在META-INF/spring/org.springframework.boot.autoconfigure.AutoConfiguration.imports配置文件中指定了第三方依赖Gson的配置类:GsonAutoConfiguration
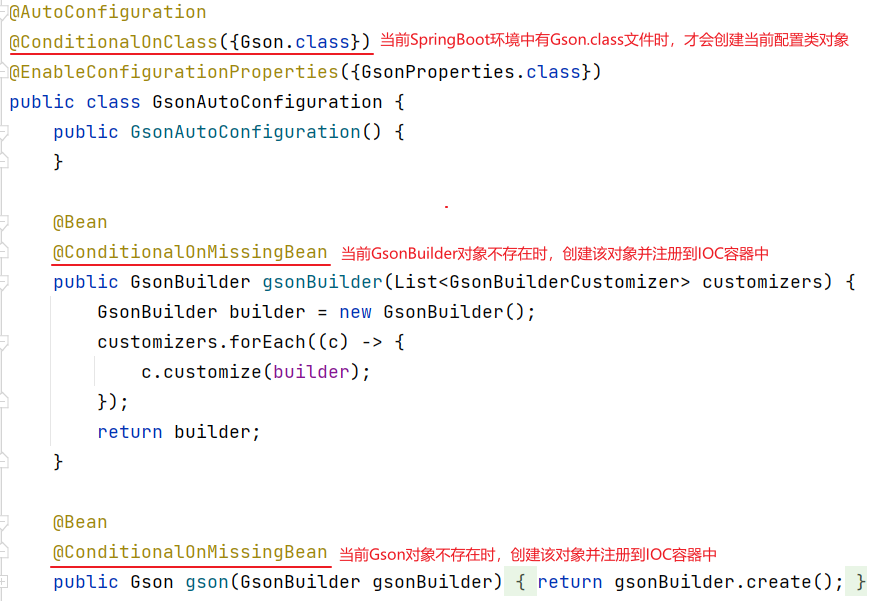
第三方依赖中提供的GsonAutoConfiguration类:
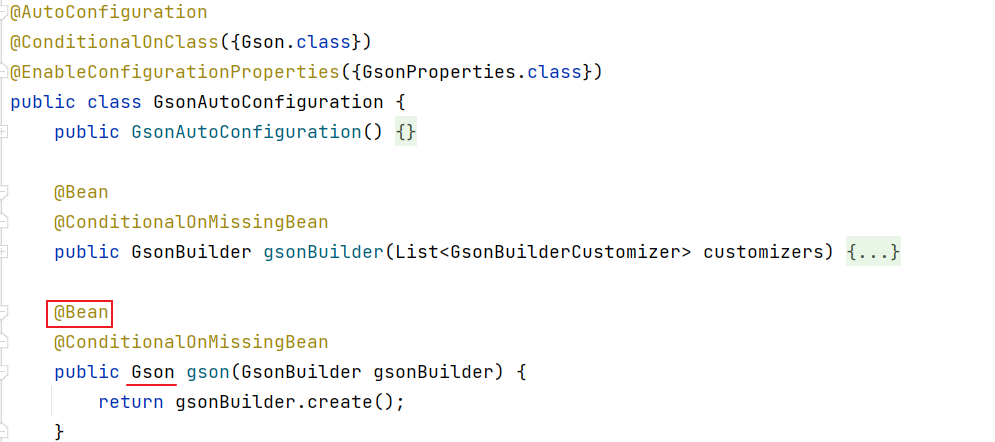
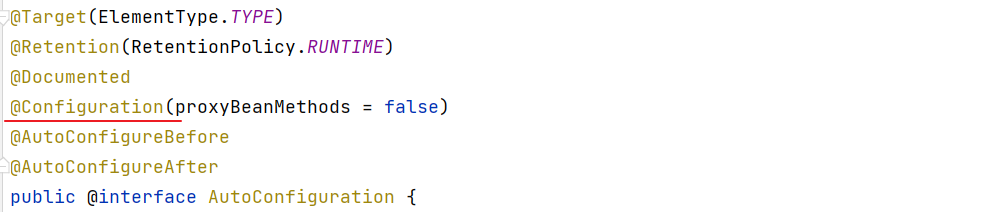
在GsonAutoConfiguration类上,添加了注解@AutoConfiguration,通过查看源码,可以明确:GsonAutoConfiguration类是一个配置。
看到这里,大家就应该明白为什么可以完成自动配置了,原理就是在配置类中定义一个@Bean标识的方法,而Spring会自动调用配置类中使用@Bean标识的方法,并把方法的返回值注册到IOC容器中。
自动配置源码小结
自动配置原理源码入口就是@SpringBootApplication注解,在这个注解中封装了3个注解,分别是:
- @SpringBootConfiguration
- 声明当前类是一个配置类
- @ComponentScan
- 进行组件扫描(SpringBoot中默认扫描的是启动类所在的当前包及其子包)
- @EnableAutoConfiguration
- 封装了@Import注解(Import注解中指定了一个ImportSelector接口的实现类)
- 在实现类重写的selectImports()方法,读取当前项目下所有依赖jar包中META-INF/spring.factories、META-INF/spring/org.springframework.boot.autoconfigure.AutoConfiguration.imports两个文件里面定义的配置类(配置类中定义了@Bean注解标识的方法)。
- 封装了@Import注解(Import注解中指定了一个ImportSelector接口的实现类)
当SpringBoot程序启动时,就会加载配置文件当中所定义的配置类,并将这些配置类信息(类的全限定名)封装到String类型的数组中,最终通过@Import注解将这些配置类全部加载到Spring的IOC容器中,交给IOC容器管理。
引出:在META-INF/spring/org.springframework.boot.autoconfigure.AutoConfiguration.imports文件中定义的配置类非常多,而且每个配置类中又可以定义很多的bean,那这些bean都会注册到Spring的IOC容器中吗?
答案:并不是。 在声明bean对象时,上面有加一个以@Conditional开头的注解,这种注解的作用就是按照条件进行装配,只有满足条件之后,才会将bean注册到Spring的IOC容器中(下面会详细来讲解)
@Conditional
在跟踪SpringBoot自动配置的源码的时候,在自动配置类声明bean的时候,除了在方法上加了一个@Bean注解以外,还会经常用到一个注解,就是以Conditional开头的这一类的注解。以Conditional开头的这些注解都是条件装配的注解。下面就来介绍下条件装配注解。
@Conditional注解:
- 作用:按照一定的条件进行判断,在满足给定条件后才会注册对应的bean对象到Spring的IOC容器中。
- 位置:方法、类
- @Conditional本身是一个父注解,派生出大量的子注解:
- @ConditionalOnClass:判断环境中有对应字节码文件,才注册bean到IOC容器。
- @ConditionalOnMissingBean:判断环境中没有对应的bean(类型或名称),才注册bean到IOC容器。
- @ConditionalOnProperty:判断配置文件中有对应属性和值,才注册bean到IOC容器。
- @ConditionalOnClass注解
@Configuration
public class HeaderConfig {

    @Bean
    @ConditionalOnClass(name="io.jsonwebtoken.Jwts")//环境中存在指定的这个类,才会将该bean加入IOC容器
    public HeaderParser headerParser(){
        return new HeaderParser();
    }

    //省略其他代码...
}- pom.xml
<!--JWT令牌-->
<dependency>
     <groupId>io.jsonwebtoken</groupId>
     <artifactId>jjwt</artifactId>
     <version>0.9.1</version>
</dependency>- 测试类
@SpringBootTest
public class AutoConfigurationTests {
    @Autowired
    private ApplicationContext applicationContext;

    @Test
    public void testHeaderParser(){
        System.out.println(applicationContext.getBean(HeaderParser.class));
    }

    //省略其他代码...
}
因为io.jsonwebtoken.Jwts字节码文件在启动SpringBoot程序时已存在,所以创建HeaderParser对象并注册到IOC容器中。
- @ConditionalOnMissingBean注解
@Configuration
public class HeaderConfig {

    @Bean
    @ConditionalOnMissingBean //不存在该类型的bean,才会将该bean加入IOC容器
    public HeaderParser headerParser(){
        return new HeaderParser();
    }

    //省略其他代码...
}
SpringBoot在调用@Bean标识的headerParser()前,IOC容器中是没有HeaderParser类型的bean,所以HeaderParser对象正常创建,并注册到IOC容器中。
再次修改@ConditionalOnMissingBean注解:
@Configuration
public class HeaderConfig {

    @Bean
    @ConditionalOnMissingBean(name="deptController2")//不存在指定名称的bean,才会将该bean加入IOC容器
    // 指定类型(value属性) 或 名称(name属性)
    public HeaderParser headerParser(){
        return new HeaderParser();
    }

    //省略其他代码...
}
因为在SpringBoot环境中不存在名字叫deptController2的bean对象,所以创建HeaderParser对象并注册到IOC容器中。
再次修改@ConditionalOnMissingBean注解:
@Configuration
public class HeaderConfig {

    @Bean
    @ConditionalOnMissingBean(HeaderConfig.class)//不存在指定类型的bean,才会将bean加入IOC容器
    public HeaderParser headerParser(){
        return new HeaderParser();
    }

    //省略其他代码...
}
因为HeaderConfig类中添加@Configuration注解,而@Configuration注解中包含了@Component,所以SpringBoot启动时会创建HeaderConfig类对象,并注册到IOC容器中。
当IOC容器中有HeaderConfig类型的bean存在时,不会把创建HeaderParser对象注册到IOC容器中。而IOC容器中没有HeaderParser类型的对象时,通过getBean(HeaderParser.class)方法获取bean对象时,引发异常:NoSuchBeanDefinitionException
- @ConditionalOnProperty注解(这个注解和配置文件当中配置的属性有关系)
先在application.yml配置文件中添加如下的键值对:
name: itheima
在声明bean的时候就可以指定一个条件@ConditionalOnProperty
@Configuration
public class HeaderConfig {

    @Bean
    @ConditionalOnProperty(name ="name",havingValue = "itheima")//配置文件中存在指定属性名与值,才会将bean加入IOC容器
    public HeaderParser headerParser(){
        return new HeaderParser();
    }

    @Bean
    public HeaderGenerator headerGenerator(){
        return new HeaderGenerator();
    }
}
修改@ConditionalOnProperty注解: havingValue的值修改为”itheima2″
@Bean
@ConditionalOnProperty(name ="name",havingValue = "itheima2")//配置文件中存在指定属性名与值,才会将bean加入IOC容器
public HeaderParser headerParser(){
        return new HeaderParser();
}
因为application.yml配置文件中,不存在: name: itheima2,所以HeaderParser对象在IOC容器中不存在
我们再回头看看之前讲解Spring Boot源码时提到的一个配置类:GsonAutoConfiguration
最后再梳理一下自动配置原理:
自动配置的核心就在@SpringBootApplication注解上,SpringBootApplication这个注解底层包含了3个注解,分别是:
- @SpringBootConfiguration
- @ComponentScan
- @EnableAutoConfiguration
@EnableAutoConfiguration这个注解才是自动配置的核心。
- 它封装了一个@Import注解,Import注解里面指定了一个ImportSelector接口的实现类。
- 在这个实现类中,重写了ImportSelector接口中的selectImports()方法。
- 而selectImports()方法中会去读取两份配置文件,一份是 spring.factories,另外一份是 autoConfiguration.imports,并将配置文件中定义的配置类做为selectImports()方法的返回值返回,返回值代表的就是需要将哪些类交给Spring的IOC容器进行管理。
- 那么所有自动配置类的中声明的bean都会加载到Spring的IOC容器中吗?
其实并不会,因为这些配置类中在声明bean时,通常都会添加@Conditional开头的注解,这个注解就是进行条件装配。而Spring会根据Conditional注解有选择性的进行bean的创建。